 I have noticed that this particular post is very popular, so welcome to my blog, please feel free to also see other posts and features in my blog. It would be great if you would come back now then and see whats new. Well enjoy!!!
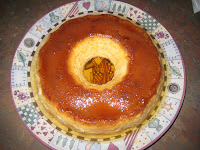
 For all of you who want a very nice dessert with no fuss, you should try this classic Brazilian pudding. It has a lot of sugar so its not something you should make every week. This dessert can make any occasion special and it will hit all the right places. But please be warned that this dessert is addictive, once you start eating you cant stop! It needs to be cold so take that in consideration when making it. I usually make it on the end of the day and eat it the next day. Like any pudding there are a lot of variations to this traditional recipe out there, I have altered the recipe as well just because I like an extra hint of orange to my pudding but they are all basically the same. The big secret of this recipe is how to make the pudding have the little bubbles in it, don't worry this recipe guarantees the bubbles in your pudding. The method seems very difficult and complex but when you do start you cant believe how easy it is! I will write this recipe in English and Portuguese so bare with me OK. Lets start....
Ingredients (
Ingredientes):
2 cans of condensed milk (
2 latas de leite condesado)
2 cans of milk -use the same cans from the condensed milk for mesaurments. (
a mesma medida de leite comum)
5 eggs (
5 ovos)
1 orange zest (
1 raspa de laranja)
Vanila extract (
estrato de baunilha)
sauce (
calda):
1 cup of castor sugar (
1 xicara de acucar)
1/2 cup of water (
1/2 xicara de agua)
*You will need a bunt baking pan


; the one that is round with the tube in the middle.
Methode (
modo de fazer):
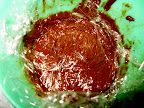
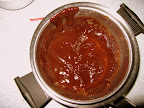
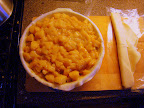
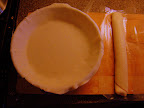
1. Start with the sauce. Please be extra careful with this step specially if you have small childeren at home because the caramel can be very hot and make a lot of damage on little or adult fingers. Bring the sugar and the water together in a small sauce pan. Let it boil in medium heat on the stove. You have to keep an eye on this all the time because it can burn and then your pudding will become bitter. When the sauce is becoming a lighter brown keep steering so it wont burn and turn the heat down a little. Let it get a little darker, you will know when its ready when it reaches a medium caramel color. In a bunt baking pan pore the caramel and make circular movements so the caramel covers the sides of the baking pan (be careful with this because the pan becomes hot so use cooking gloves). Set aside to cool completely (this is very important because if you don't let it cool completely it will make scramble eggs of you pudding). While its cooling get a deep backing pan in which the bunt baking pan will fit inside. Poor warm water in it and stick it in the oven and pre heat your oven 200 Celsius. This will insure that the water will be warm when you put the pudding in the water in the deep baking pan. This is the secret for the little bubbles in your pudding!
Misture o açúcar refinado com a água e leve no fogo sem mexer no comeco e depois quando comecar a escurecer mexa até ficar com cor de guaraná. Coloque em forma de buraco no meio e mexa a forma até caramelizá-la por igual. Espere a calda ficar em temperatura ambiente. Caso contrario a temperatura da calda poderá talhar o pudim.
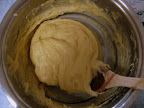
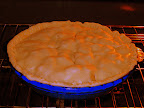
2. When the caramel is cool you can start making the pudding. Put all the ingredients together the eggs, milk, condensed milk, orange zest and vanilla extract (its up to you how much you want from the vanilla) in a blender. Blend it on high for 5 minutes. Pore the liquid into the bunt baking pan. Put the bunt pan on the water in the deep baking pan, who is already hot in the oven. Let it bake uncovered for about ten minutes or till you see the top becoming a nice golden colour. When this happens just cover the pudding with aluminum foil and let it bake for 1 hour, keep an eye on the water and be sure to top it up, you need the water so it wont burn the pudding.
Bata todos os ingredientes no liquidificador por cinco minutos. Despeje o pudim na forma já caramelizada. Para você conseguir um pudim com bastantes furinhos, leve ao forno em banho-maria com a água já quente. O forno deve estar pre-aquecido 200 graus. Deixe o pudim discoberto ate ele comecar a ter uma cor de caramelo ai voce pode ccobri-lo com papel aluminio. Deixe em fogo alto por uma hora.
3. You should be able to see if the pudding is ready if it has risen like a souffle and if you prick the middle with a tooth pick and no liquid comes out than you can take it out of the oven. Let it cool completely before bringing it to the fridge; please leave the aluminum foil on or your pudding will take the flavour of your fridge and that is yuck.
Voce vai poder saber se o pudim esta pronto quando ele crescer como um souffle. Ele quase dobra de tamanho. So pra ter certeza faca o teste do palitinho. Retire do forno e deixe esfriar completamente antes de coloca-lo na geladeira.
4. The next day you can take it out of the fridge and in the same deep baking pan add hot water and let the pudding sit on it for a while, this insures that the caramel will melt and make it easier for you to turn the pudding on a plate. I leave it in the water till the water cools down.
No dia seguinte ou depois que o puddim esteja bem gelado coloque em banho maria novamente so para a calda degrudar da forma. Voce nao presica colocar ele no forno!!!! Deixe ele de banho maria ate a agua esfriar.
5. Now this is the moment of truth!! With a knife cut the pudding from the side of the baking pan. Put a nice big plate on top of the bunt backing pan and turn it upside-down and leave it for a while. Don't mess with it, just let the pudding slowly on its own fall down to the plate. If you mess with it it will brake and you will have an ugly pudding. It will fall, trust me and then there it is you beautiful delicious traditional Brazilian pudding. Very very yummy....specially very cold!
Agora e o momento da verdade. Com um faca descole as laterais da panela. Num prato grande coloque-o em cima da panela do pudim e vir-o de cabeca para baixo para desformar. Deixe ele cair sozinho, nao bata na panela pois vc pode quebraro pudim e ai vc tem uma meleca de caramelo. Deixe o pudim cair sozinho. E quando ele cair vc tera um lindo pudim com furrinhos que e uma delicia!


